This post was originally uploaded on: 16 June 2006
-------------------------------------------------------------
Here's a tutorial I used to have on my france.topcities.com website, which went *poof* in a puff of smoke around 17th May 2006! I have no idea why, and I'm cross! Hence my assaulting my blog with a vengeance, filled with useful (i hope) information. I'm still not sure what I'm going to be able to do with the index of TRG, APC and S&P I was working on (with a lot of helpers along the way) but in the meantime, here's my next installment, sort of moving, and unpacking cardboard boxes... one at a time, I'm moving from BottomCities to Blogspot! Here's my housewarming present to you a:
France's Stampamajiggies Tutorial
Caught in... Anna's Way!
A variation on the caught in crystal method, inspired by Anna Keohan.

I tried this technique once, about a year ago, and loathed it. It made a
mess, I didn't like the results, I didn't think I could do it. I was a bit envious of people who did it, people like Anna, who seemed to be so good, and prolific, at it! Anna's creations are what inspired me to give the technique, yet another go. Anna mentioned she uses acrylic paints. Ah! that was quite a revelation, as my reinkers just didn't cut it for me.So, don't let anything stop you, and make sure you look at the list at the bottom of the tutorial for other ways to do this technique. Play around until you find one you like.
There are currently no pictures of the various steps, available for this tutorial. I'll be working on them, one day.
Materials:
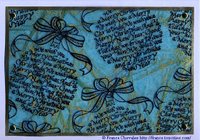
- Stamp(s) - In the sample, I used a Bauble by Rubberstamp Ave
- Acetate (I used "Highland film for plain paper copiers" described as"economical film for most plain paper copiers" available at Officeworks)
- Memories Black ink or Collections Private Label Black Dye Ink
- Acrylic paints (Anna adds: and/or metallic folk art acrylic paint eg Plaidbrand "coz the colours available are so yummy, and you do get a hint of the metallic gleam through the acetate")
- Pile of old newspapers
- Pascoe's Long Life Self Shining Floor Polish (in the USA: Future Floor Polish, in New Zealand: Johnson's One and All)
- Spray bottle to be filled with above Floor Polish (and to be hence,dedicated to the cause. But do clean the nozzle each time to avoid blockage)
- Spray bottle filled with water (yes, a different one!
- Glitter (I like glitter with this technique)
- Packing tape (clear tape will do too!)
- Disposable gloves
- Paintbrush and little container of water
- Heat gun (I don't use it, some people do)
- Tissues/Kleenex or toilet paper, paper towels (not always necessary)
Method:
Randomly stamp your chosen image on the acetate. Let dry or help to dry with the use of a heat gun (I skip that step and just let the sheet air dry overnight).
Pour your floor polish into a spray bottle. We all know you won't use it on your floors, and if you decide to, you can always unscrew the nozzle!
Take the acetate and place it face down on a piece of newspaper or scrap paper. Seal all edges with packing tape. I like to secure the edges with scotch tape (sticky tape) before using the brown packing tape.
When the edges are sealed, spray a small amount of the floor polish on to the acetate. I like to spread it with my fingers (gloved preferably) or a paint brush which I rinse straight after. You don't want a whole lot of liquid on your page, you do want a thin film.
If you do use glitter, sprinkle it on now. As much or as little as you want, it all depends on the effect you wish to create. Let dry. When this is dry, dab small blobs of paint randomly over acetate, just enough to smoosh around to cover the whole surface. Spray a bit of the floor polish to help the paint glide over the surface more easily. Using a paint brush or a gloved finger ( or a couple of fingers!) gently smoosh the paint and the floor polish together, until the whole area is covered - go gently and try not to muddle the colours together too much, as it may end up looking 'muddy'. Rinse the paintbrush or your fingers. (I'd like to thank Anna for her description of that step, no one does it quite like you, Anna!!) ~ in the sample above, I used only one colour of paint, pale gold by Jo Sonja, as that's the look I was after.
When this is done, take your piece of tissue paper, scrunch it all up. Open it up, smooth it out somewhat, and lightly spritz it with the water bottle.Place the tissue paper carefully on top of the painted/floor polished surface. I find this is easily done if you start at one edge and slowly place the tissue paper down on the surface, you avoid bubbles that way.When you've finished putting the tissue paper down, what I like doing is gathering the tissue paper a bit, in areas, to create valleys and ridges.It creates patterns which add to the depth of the texture. Using your paint brush, in a gentle stippling motion, pat down the tissue paper so that there are no bubbles and that the tissue paper adheres to the floor polish.Add a bit more floor polish if necessary.
Let dry.
Cut the sheet in four. Adhere to a card with double sided tape (make a test first, the tape might show with various colours of card and/or tissue paper) or with brads or eyelets in each corner.Affix an insert. And you're done.
Of all the links I had, these are the last two that seem to work. there are many names for this technique, have a look on the web. Some people do that technique with PVA as well, or Dimensional Magic/Crystal Lacquer etc. (floor polish and PVA are the "craft on a budget" alternatives.
You can also find those techniques under different names: Caught in Crystal, Crazy Glass, Window Plastic, etc.
This tutorial © 2003-2008 France Chevalier (but I did not invent the tech, you can't copyright a technique but you can copyright instructions! Very interesting).
Hope you enjoyed this technique. LMK if you try it!

No comments:
Post a Comment